Weather App Project


Building a Weather App: A Beginner's Journey into Web Development
Introduction
As a budding software engineer, I embarked on a project to create a weather application. The goal was to develop a minimalist weather app that displays the current weather and provides hourly and 7-day forecasts. In this blog post, I'll share my experience and the process behind creating this project.
Technologies Used
For this project, I utilized JavaScript, HTML, and CSS as the primary technologies. JavaScript was used to handle the logic and API integration, while HTML and CSS were responsible for structuring and styling the user interface.
Project Structure
The project consists of several files, including index.html, index.js, styles.css, and city.json. The index.html file serves as the main entry point, while index.js handles the application logic. The styles.css file defines the visual appearance of the weather app. Additionally, city.json stores city-related information used in the application.
Features and Functionality
Upon loading the app, it automatically detects the user's current location using the browser's geolocation feature. By leveraging the OpenStreetMap Nominatim API, the app retrieves the name of the location based on the coordinates. This information is then used to fetch the current weather data from the WeatherAPI.com API, providing real-time weather conditions.
Summery
document.addEventListener('DOMContentLoaded', async (event) => {
    try {
        const coordinates = await getLocation();
        fetch (`https://nominatim.openstreetmap.org/reverse?format=jsonv2&lat=${coordinates[0]}&lon=${coordinates[1]}`)
        .then (response => response.json())
        .then (data => {
            console.log (data)
            console.log (data.address.city)
            let cityTown;
            if (data.address.city != undefined) {
                cityTown = data.address.city
            } else if (data.address.town != undefined) {
                cityTown = data.address.town
            }

            //creating weather panel and invoke function of autocomplete while searching place
            creatingWeatherPanel(cityTown)
            initAutocomplete();

            const searchIcon = document.getElementById('search-icon');
            searchIcon.addEventListener('click', function(event) {
                event.preventDefault();
                creatingWeatherPanel(document.getElementById("autocomplete-input").value.split(',')[0])
                updateCityList(document.getElementById("autocomplete-input").value)
              });

            const displayCityWeather = document.querySelector("form#display-city");
            displayCityWeather.addEventListener("submit", (event) => {
                event.preventDefault();
                creatingWeatherPanel(event.target['city-name'].value.split(',')[0])
                updateCityList(document.getElementById("autocomplete-input").value)
            })

            const tomorrowWeather = document.querySelector('button#Tomorrow');
            tomorrowWeather.addEventListener ('click', (event) => displayWeatherTomorrow (document.querySelector('p#pLocation').textContent.split(',')[0]))

            const todayWeather = document.querySelector('button#Today')
            todayWeather.addEventListener ('click', (event) => creatingWeatherPanel (document.querySelector('p#pLocation').textContent.split(',')[0]))

            const sevenDays = document.querySelector('button#sevenDays')
            sevenDays.addEventListener ('click', (event) => sevenDayForecast(document.querySelector('p#pLocation').textContent.split(',')[0]));

            customCityLoad();

            const historyHeading = document.getElementById('history');
            const cityList = document.getElementById('city-list');
            cityList.setAttribute('hidden', 'hidden');

            let isCityListHidden = true;

            historyHeading.addEventListener('click', () => {
              if (!isCityListHidden) {
                cityList.setAttribute('hidden', 'hidden');
                isCityListHidden = true;
              } else {
                cityList.removeAttribute('hidden');
                isCityListHidden = false;
              }
            });

        })
        .catch (error => alert(error.message))
    } catch (error) {
        console.error(error);
    }
})
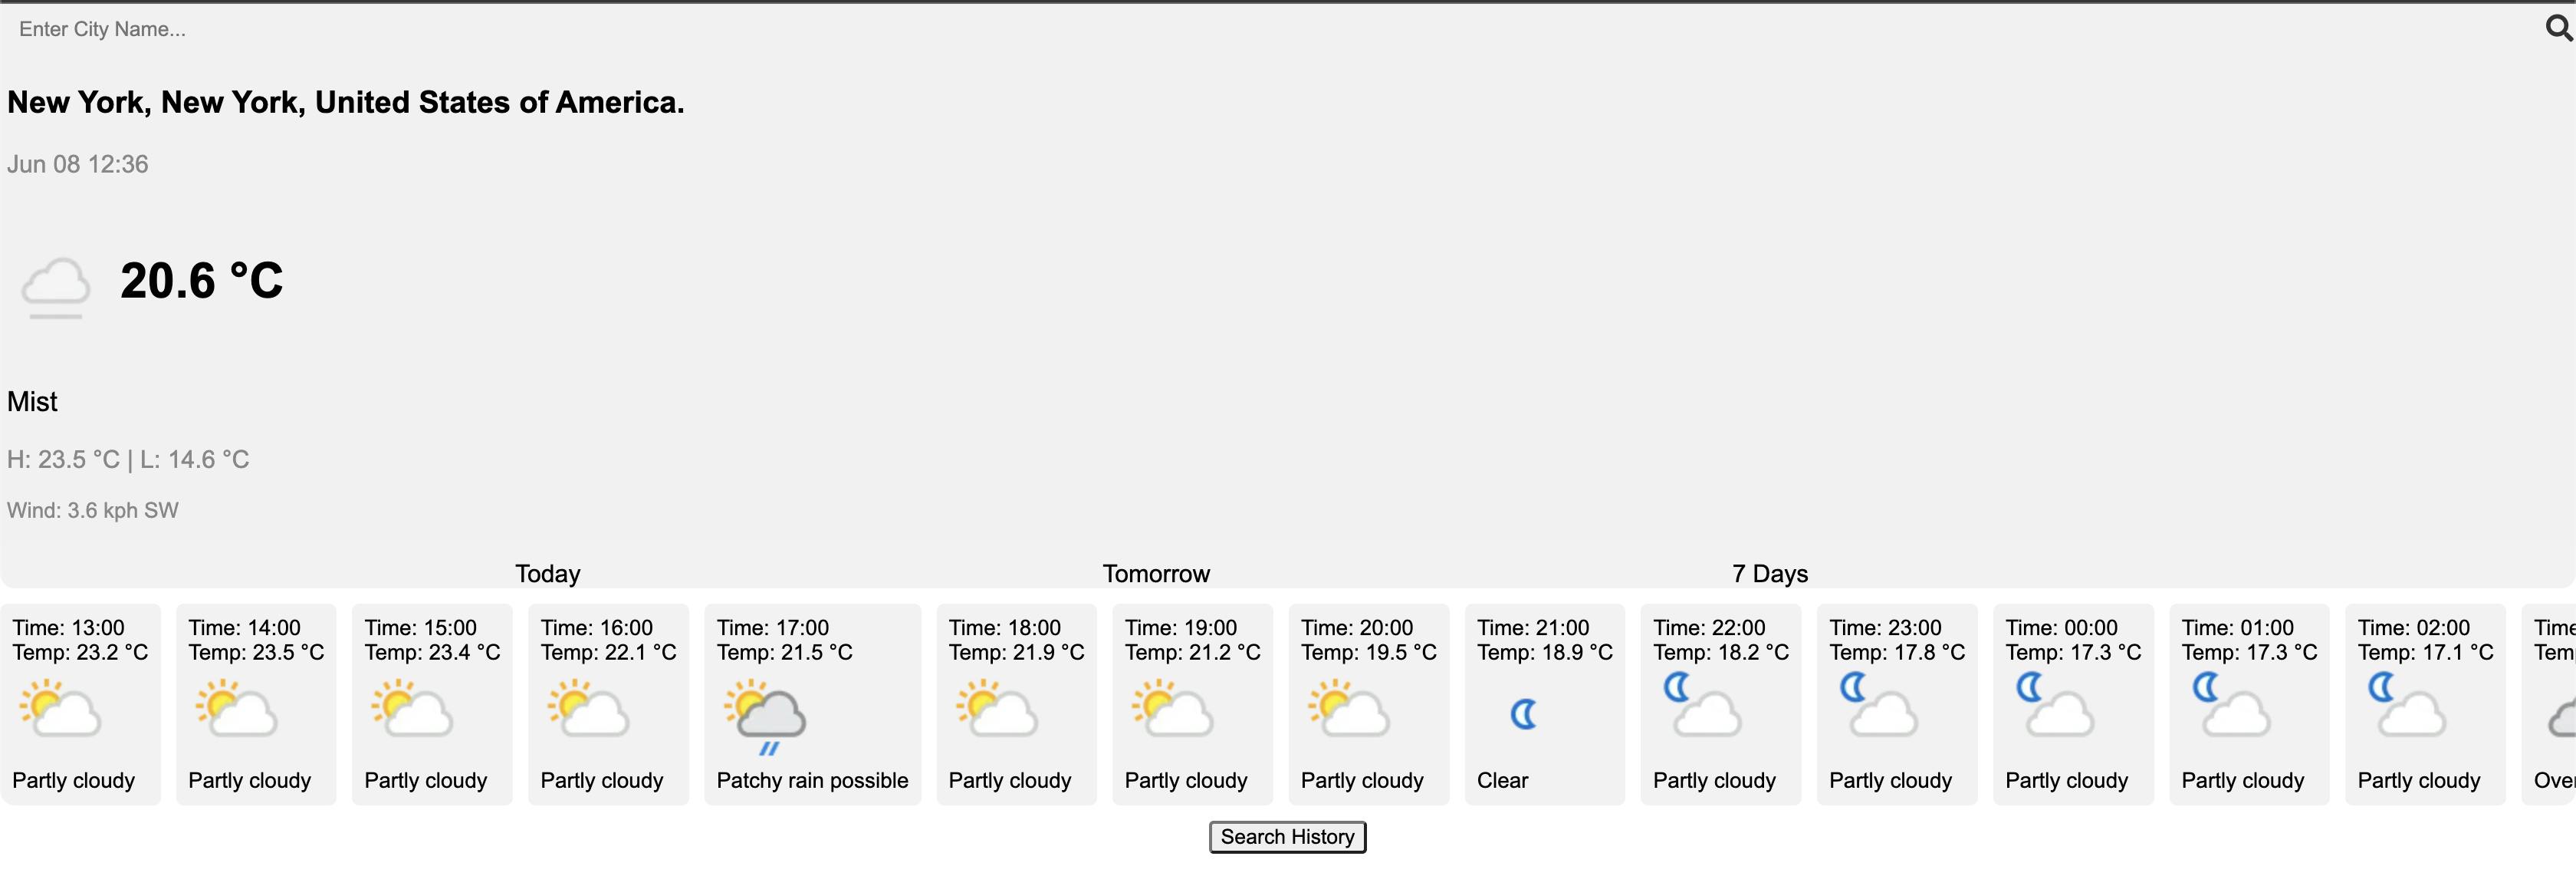
The app presents weather information in a clean and minimalist design. A main weather panel displays the current date, temperature, weather icon, wind conditions, and highest and lowest temperatures. Three buttons allow users to switch between today's weather, tomorrow's weather, and a 7-day forecast. Below the main panel, an hourly forecast panel shows the weather conditions for the next 24 hours.
The provided code represents a function called hourForecastArr that is responsible for generating an array of hourly forecast data based on the input data.
The function begins by extracting the local hour from the data object's location.localtime. It splits the string to isolate the hour value using spaces and colons, and then converts it to a number using the + unary operator.
The code initializes an empty array called
forecastDatato store the hourly forecast information.A loop is used to collect the next 24 hours of weather forecast data. The loop iterates from the local hour (plus 1) to the local hour (plus 25). The condition
i < 24ensures that the loop stays within a 24-hour range.Inside the loop, an
ifstatement checks if the hour is within the current day's forecast or the next day's forecast. If the hour is within the current day, an hourly forecast item object is created using the corresponding data from thedataobject'sforecast.forecastday[0].hourarray. The relevant properties extracted are:time: The hour of the forecast (extracted from thetimeproperty and formatted).temp_c: The temperature in Celsius.img: The icon representing the weather condition.weatherCondition: A text description of the weather condition.
If the hour is beyond the current day (i.e.,
i >= 24), the code enters theelseblock. An hourly forecast item object is created using the corresponding data from thedataobject'sforecast.forecastday[1].hourarray. The relevant properties are extracted in the same manner as described in step 4.The created hourly forecast item object is then pushed into the
forecastDataarray.Once the loop completes, the
forecastDataarray, containing the hourly forecast data for the next 24 hours, is returned.
function houreForecastArr(data) {
    let localTimeHoure = data.location.localtime.split(' ')[1].split(':')[0];
    console.log (+localTimeHoure);

    //collect next 24 houre weather forecast
    const forecastData = [ ];
    //console.log (data.forecast.forecastday[0].hour[16].time)
    let j = 0;
    for (let i = +localTimeHoure + 1; i < +localTimeHoure + 25; i++) {
        if (i < 24) {
            const houreItem = {
                time: data.forecast.forecastday[0].hour[i].time.split(' ')[1],
                temp_c: data.forecast.forecastday[0].hour[i].temp_c,
                img: data.forecast.forecastday[0].hour[i].condition.icon,
                weatherCondition: data.forecast.forecastday[0].hour[i].condition.text
            }
            forecastData.push(houreItem)
        } else {
            const houreItemNextDay = {
                time: data.forecast.forecastday[1].hour[j].time.split(' ')[1],
                temp_c: data.forecast.forecastday[1].hour[j].temp_c,
                img: data.forecast.forecastday[1].hour[j].condition.icon,
                weatherCondition: data.forecast.forecastday[1].hour[j].condition.text
            }
            forecastData.push(houreItemNextDay)
            j++
        }
    }
    return forecastData;
}
The function
createHourlyForecastElementstakes in theforecastData(array of Objects)as a parameter, which represents the hourly forecast data.It starts by resetting and preparing the forecast container element (
div#hour-forecast) to hold the hourly forecast elements. The container'sinnerHTMLis cleared, and the display and justification properties are reset.Event listeners are added to handle the mouse interaction for sliding the forecast container. Here's how each event is handled:
mousedown: When the mouse button is pressed down on the forecast container, theisMouseDownflag is set totrue, and the initial mouse position (startX) and scroll position (scrollLeft) are recorded.mouseleave: If the mouse leaves the forecast container, theisMouseDownflag is set tofalse, indicating that the sliding action should stop.mouseup: When the mouse button is released, theisMouseDownflag is set tofalse.mousemove: If the mouse is moved while theisMouseDownflag istrue, the function calculates the distance and direction of the mouse movement (walk). It then adjusts the scroll position of the forecast container (forecastContainer.scrollLeft) based on the initial scroll position and the mouse movement, resulting in a smooth sliding effect.
The function proceeds to create individual hourly forecast elements based on the
forecastDataprovided. For each hour in the forecast data:A new
divelement is created and assigned the classhour-forecast.Several child elements are created to display the time, temperature, weather condition, and an image representing the weather.
The child elements are appended to the
hourDiv.The
hourDivis then appended to the forecast container (forecastContainer).
function createHourlyForecastElements(forecastData) {
    //console.log(div)
    const hourForecast = document.getElementById('hour-forecast');
    hourForecast.style.display = '';
    hourForecast.style.justifyContent = '';

    const forecastContainer = document.querySelector(`div#hour-forecast`)
    forecastContainer.innerHTML = ''

    let isMouseDown = false;
    let startX = 0;
    let scrollLeft = 0;

    // handle mouse down event
    forecastContainer.addEventListener('mousedown', (e) => {
        isMouseDown = true;
        startX = e.pageX - forecastContainer.offsetLeft;
        scrollLeft = forecastContainer.scrollLeft;
    });

    // mouse leave event stops slide
    forecastContainer.addEventListener('mouseleave', () => {
        isMouseDown = false;
    });

    // mouse up event stops slide
    forecastContainer.addEventListener('mouseup', () => {
        isMouseDown = false;
    });

    // handle mouse move event
    forecastContainer.addEventListener('mousemove', (e) => {
        if (!isMouseDown)
            return;
        e.preventDefault();
        const x = e.pageX - forecastContainer.offsetLeft;
        const walk = (x - startX) * 2; // sliding sensitivity adjustment
        forecastContainer.scrollLeft = scrollLeft - walk;
    });

    // create hourly forecast elements
    forecastData.forEach((hour) => {
        const hourDiv = document.createElement('div');
        hourDiv.classList.add('hour-forecast');

        const time = document.createElement('p');
        time.textContent = `Time: ${hour.time}`;
        hourDiv.appendChild(time);

        const temperature = document.createElement('p');
        temperature.textContent = `Temp: ${hour.temp_c} °C`;
        hourDiv.appendChild(temperature);

        // might add pics also
        const tempImg = document.createElement('img');
        tempImg.src = `http://${hour.img.slice(2)}`
        hourDiv.appendChild(tempImg);

        const weatherTxt = document.createElement('p')
        weatherTxt.textContent = `${hour.weatherCondition}`
        hourDiv.appendChild(weatherTxt)

        forecastContainer.appendChild(hourDiv);
    });
}
API Integration
To integrate the APIs into the app, I relied on the OpenStreetMap Nominatim API to retrieve location names based on coordinates. The WeatherAPI.com API provided detailed weather information for the specified location. Additionally, Google's Maps API was utilized to provide location suggestions as users type in the search bar.
User Interface and Design
The user interface of the weather app follows a minimalistic design approach. The gray background of the main weather panel enhances readability, while the carefully chosen font and color palette create a visually pleasing experience. The search bar at the top allows users to search for specific locations, and the app provides suggestions to facilitate the process.
Challenges Faced
During the development process, I encountered several challenges. One of the main hurdles was finding suitable APIs that provided free weather data access. I invested time in research and eventually discovered the WeatherAPI.com API, which offered a comprehensive set of weather data for free. Additionally, fine-tuning the CSS to achieve the desired layout and positioning of elements required some experimentation and debugging.
Lessons Learned
Working on this weather app project provided invaluable lessons. I gained proficiency in JavaScript and API integration, improving my understanding of asynchronous programming and handling HTTP requests. Additionally, I became more adept at using HTML and CSS to create responsive and visually appealing user interfaces. Through debugging and troubleshooting, I honed my problem-solving skills and learned to refactor and optimize code for better readability and maintainability.
Future Improvements
As with any project, there are areas for future improvement. One enhancement could involve incorporating captivating background images that reflect the current weather conditions, making the app more visually engaging. Another potential enhancement could be implementing support for the American measurement system, offering users the option to switch between Celsius and Fahrenheit, kilometers and miles, and other units.
Conclusion
Developing the weather app from scratch was both challenging and rewarding. It provided an excellent opportunity to apply the knowledge and skills I've acquired as a beginner software engineer. The project allowed me to deepen my understanding of JavaScript, HTML, and CSS while gaining practical experience with API integration. I look forward to further enhancing the app's functionality and aesthetics as I continue my journey as a software engineer.